

|
| Home Screenshots Applet Download Manual |
|
| User's Guide to Arcus |
for Arcus 0.3.2
Table of Contents
This page serves as a guide to Arcus. The main parts of the program are the Instances, the Editors and the Pattern Stores. The following sections discuss them in detail.
An instance consists of three parts: a 3D visualization of a Rubik's Cube called Display, a History panel and a Console. The Display is responsible for showing the cube's state as a nice graphics, doing animated turns, responding to mouse events. The History keeps track of each turn happened to the cube, and allows the user to display and examine former states without the constraint of taking back any moves or loosing the current pattern. The Console is for those who want to run maneuvers written in a special language, which is covered in the subsection 2.4.
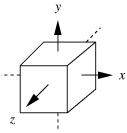
The position of the view can be changed by rotating the cube. A rotation does not alter the state (that is, the pattern) of the cube, only changes the aspect you can see it from. The state is modified only if you turn a face or a layer.
You can rotate the cube around the x, y and z axes by dragging it with the mouse while holding a button down. (See fig 1 for the placement of the axes.) The mouse buttons select the axis the cube will be rotated around. By default, the left button selects rotation around the axes x and y, while the middle button specifies axis z.
|
| |
| Fig. 1 | Fig. 2 |
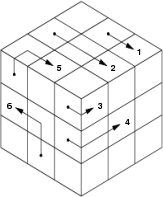
A cube has 3×3 layers which can be turned independently. The numbered arrows in fig 2 indicate different mouse drags with the right button pressed on the cube.
The effects of the drags are:
Note that the path of the drag does not matter, only the start and end points (facelets) are relevant.
The toolbar can be expanded using the  button located in the upper left corner. The toolbar
buttons come with the following actions (from left to right):
button located in the upper left corner. The toolbar
buttons come with the following actions (from left to right):
 Add the pattern to the Pattern Store.
 Scramble the cube applying 10 random
turns.
Scramble the cube applying 10 random
turns.
 Solve the cube with the clean cube as
the goal state. It is the most commonly used subset of the general
solver, so it is presented as a separate button for convenience.
Solve the cube with the clean cube as
the goal state. It is the most commonly used subset of the general
solver, so it is presented as a separate button for convenience.
 Solve the cube with an arbitrary
pattern as the goal state. You will have to click on a cube (in an
Editor, in the Pattern Store, or just in another Display) to specify
the goal state of the solving algorithm.
Solve the cube with an arbitrary
pattern as the goal state. You will have to click on a cube (in an
Editor, in the Pattern Store, or just in another Display) to specify
the goal state of the solving algorithm.
Tip: it is possible to solve a cube from a particular state. What you need to do is this:
button so that the toolbar becomes visible. button, then click on the
Editor's cube to pick up the pattern. Click the Solve button
in the dialog that comes up. The Instance will start to solve towards the
selected pattern. When it is done, the Instance will have the
pattern you want to start from. button on the toolbar to
start solving from that state towards the clean state.You can specify 10 different positions, which are available using the keys 0-9. The CTRL+# key combination (where # denotes a number) saves the cube's current position as the #th one. Switching to a new position will also draw its number on the screen for about 2 seconds. Pressing ESC while the number is shown causes the position to be reset to the default value. The TAB key aligns the cube to the actual position.
The History records each turn of the cube, and displays them as a horizontally scrollable graph. The meaning of the value shown by the boxes is the average number of different colors being on one side. This number is at least 1 (which happens if and only if the cube is clean), and less than or equal to 6, since there are 6 different facelet colors. The color of the boxes denotes the source of the turns as follows:
Green - you turned the cube using the mouse.
Red - the cube has been scrambled.
Blue - the cube has been solved.
Orange - the turns came from the console.
You can iterate through the recorded turns backwards and forwards, either starting a continuous playback, or just invoking the next turn in the queue. The cursor always shows the state of the cube which is visualized by the related Display. Turning the layers directly in the Display or attempting to solve the cube is only allowed if the cube is in its real state, that is, the cursor stands on the last element in the History.
The sequence of the stored turn events can be trimmed to the
cursor by pressing the  cut button on the
toolbar. This removes the turns after the cursor, so the state
indicated by the cursor becomes the cube's real state. The bottom
toolbar with the progress bar shows the state of the buffer which
holds the turns that have not been processed yet. You can
cut button on the
toolbar. This removes the turns after the cursor, so the state
indicated by the cursor becomes the cube's real state. The bottom
toolbar with the progress bar shows the state of the buffer which
holds the turns that have not been processed yet. You can  delete the content of the buffer, or
  flush it, causing the turns be processed in one
step, without animation (the ongoing animation will be finished
though). They take effect at any time, even during animations.
flush it, causing the turns be processed in one
step, without animation (the ongoing animation will be finished
though). They take effect at any time, even during animations.
Each turn has a textual representation, a command, which specifies the layer to turn and the direction of the turn. These commands can be typed in the Console. It supports unlimited history accessible via the up and down arrow keys, scrolling with SHIFT+Up/Down (unit increment) and SHIFT+PgUp/PgDn (block increment).
The syntax of a command is
<SIDE>[<LAYER>][<DIRECTION>]
As you can see, a command consists of three parts (three characters in fact): a mandatory side specification, an optional layer specification and an also optional direction specification. The SIDE must be one of the F, B, U, D, R, L letters, which stand for Front, Back, Up, Down, Right and Left, respectively.
The LAYER specification may be missing (denoting an outer side), can be i for inner layer (aka middle layer), and there are two convenient wrappers: letter p for two parallel outer sides and a for all three parallel layers. They will resolve to two and three single-layer turns.
The DIRECTION specification may also be missing, or be either ' (single quote) or 2 (the figure two). The lack of the direction specification means a clockwise turn, the quote stands for a counter-clockwise turn, and the figure 2 denotes a double turn. Directions are meant from a view facing to the given side.
You can build up complete maneuvers from the individual commands by writing one after the other. Albeit it is important not to put any space inside a command, you can put any amount of spaces between the commands. You can create loops, that is, groups of successive commands that will evaluated more than once. The syntax of a loop is
(<COMMAND> [<COMMAND> ... ]) <NUM>
where the sequence in parentheses will be executed NUM times. Loops can also be nested.
Examples:
R L U2 R' L' F' B' U2 F B
URRi'U RiU2Ri' URiR'U'
((F2R2)3 (B2L2)3)2
The above introduced notation system is the default and follows the English conventions; it can be customized in the Preferences panel, so that you can tailor them to suit your own language and tastes.
Editors can be launched independently from Instances. Their task is to allow the user to edit the pattern of a Rubik's Cube, in a similar way as you could peel the stickers off and stick them back in a different order. You can pick the colors of the middle facelets, and apply them to the facelets of the edge and corner cubies using the right mouse button. The current pan color is shown in the upper right corner. Producing patterns that a real cube cannot adopt is allowed; though these patterns can be stored in the Pattern Store and copied to other Editors, they cannot serve as a goal pattern of a solvig algorithm.
The toolbar buttons (expandable the same way as the Display's toolbar) come with the following actions (from left to right):
Add the pattern to the Pattern Store.
 Check if the current pattern is valid.
 Grab the pattern from an arbitrary
cube. You will have to click on the cube whose pattern you want to
copy.
Grab the pattern from an arbitrary
cube. You will have to click on the cube whose pattern you want to
copy.
The Pattern Store is a container holding patterns copied from Displays and Editors. Saving is done in GZIPped XML format (.arcsp). You can append a collection loaded from disk to the current one. Patterns can be removed from the collection using the DELETE key. Reordering can be done by dragging the patterns with the right mouse button.
Each Instance and Editor has a slot in the Main window. The text field displays the name of the Instance, and also allows the user to modify it. Instances and Editors can be cloned and deleted there as well.
Displays, Histories, Consoles and Editor are arranged in tabbed
containers. Using the  button, each tab
is detachable to a separate toplevel window from the tabbed
container. Closing the new window will attach its content back where
it was detached from. You can attach/detach all components related to
an Instance clicking on the appropriate menu item brought up by the
button, each tab
is detachable to a separate toplevel window from the tabbed
container. Closing the new window will attach its content back where
it was detached from. You can attach/detach all components related to
an Instance clicking on the appropriate menu item brought up by the
 button on the Main window.
The following table summerizes the shortcuts which can be used in
different windows and widgets to improve the usage of Arcus. The
character # (hash mark) indicates a number (0-9).
| Scope | Shortcut | Action |
|---|---|---|
| Display Editor Pattern Store | # | Set the cube's position to position #. |
| CTRL + # | Save current position as position #. | |
| TAB | Align the cube to the actual position (formerly set by pressing #). | |
| ? | Show the actual position (formerly set by pressing #). | |
| ESC | While the position number # is shown on screen, reset the position # to the default position. | |
| Display | SPACE | Show/hide side names |
| Console | SHIFT + Up | scroll up one line |
| SHIFT + Down | scroll down one line | |
| SHIFT + PgUp | scroll up one page | |
| SHIFT + PgDown | scroll down one page | |
| CTRL + L | clear the text area (not deleting the Console's history, however) | |
| Pattern Store | DELETE | Remove the focused pattern form the collection. |
| Hosted by | |

|
|